WordPress security should be in your checklist when creating a WordPress site, so in this article we will talk about 8 Easy steps to harden WordPress security.
WordPress is the most used CMS(Content management system) that also means there will be lot more people having their eyes to breach the security and gain access to the websites.
To further make it worse WordPress is an open system, which means it gives the feature of using third-party plugins and themes. So the surface area of attacks increases as some plugin/theme developers may end up making a mistake which will help the attacker do their malicious work.
So does that mean you should stop using plugins/themes?
The answer is no, surely there is a possibility of a security flaw in WordPress or the plugins. But you can make sure these flaws doesn't make you a part of the breach by following the 5 easy steps to harden WordPress security we have listed below.
1. Protection From Brute-force attacks using Loginizer.
2. Keeping WordPress updated.
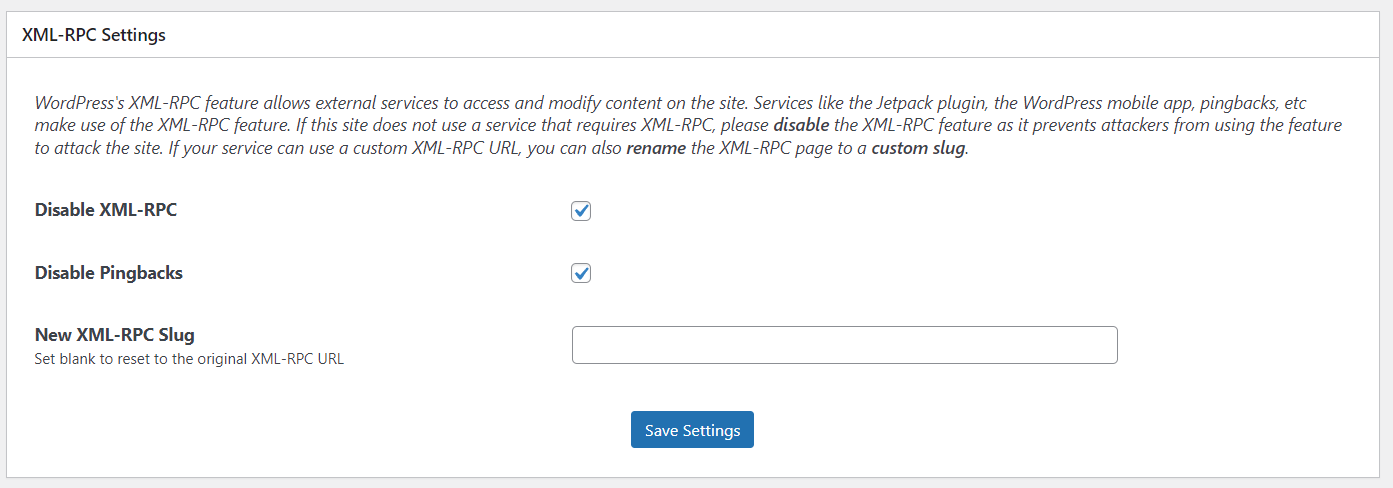
3. Disable XML-RPC and pingbacks.
4. Using a good webhosting.
5. Having SSL/HTTPS
6. Using strong password
7. Scanning WordPress for Malwares and vulnerabilities.
8. Backups
We are using Loginizer for examples here, but you can explore other options from this list of the Best Security plugins for WordPress
1. Protection from Brute-force attacks using Loginizer
Brute-force attacks are those which try to gain access to your WordPress Admin, by constantly trying to login to your website.
The way the attacker try to gain access is by trying to login multiple times with a combination of usernames and passwords. Brue-force attacks works like hit and trial method.
As with the advancement in the power of processing these attacks are easier to do compared to earlier. So you can simply protect your website from Brute-force attacks by using Loginizer.
Loginizer comes with basic Brute-force protection out of the box. So the moment you Install and activate Loginizer. It starts protecting you from Brute-force attacks.
So the default options are good enough but we want to get the best out of the plugin we use. So here are the options we suggest you use to Protect your website using Loginizer.
Limit Login Attempts
As I just mentioned above Loginizer comes with basic Brute-force protection settings so one of the settings that is enabled by default is Limit Login attempts.
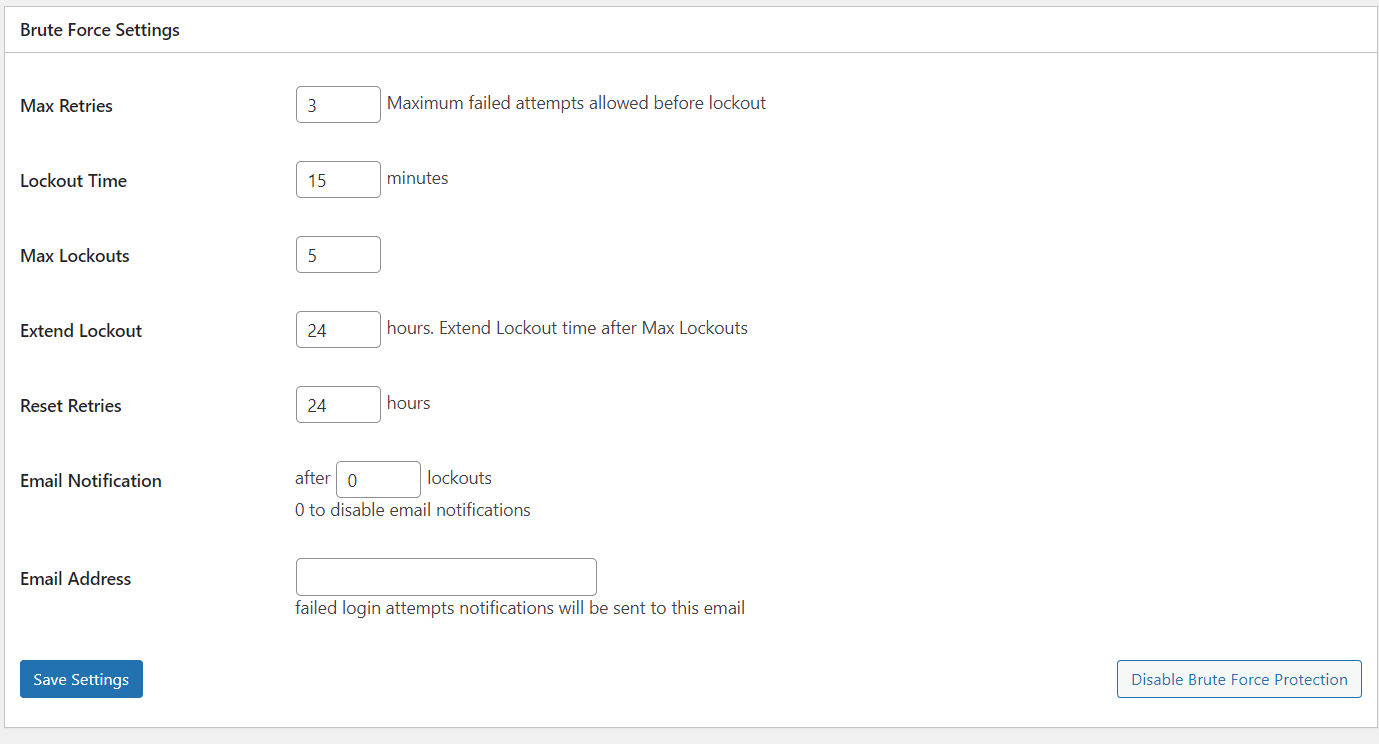
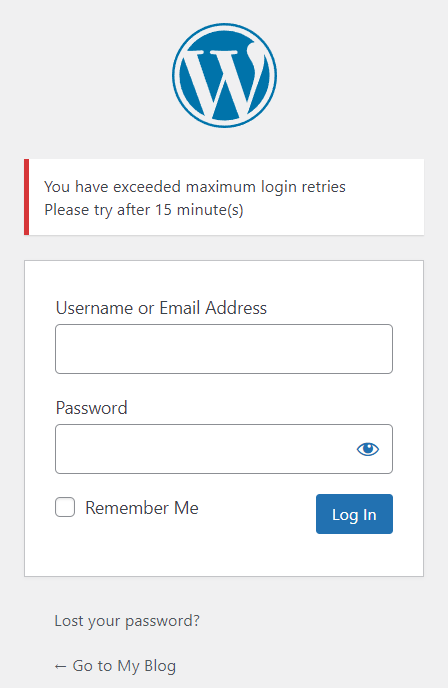
What it does is if a user fails to login for (n) number of times by default max tires is 3 then Loginizer will put that users IP on the Lockout list and that user will need to wait for 15 minutes (which is a default value and can be changed) before trying another login attempt.
As there is a default settings already in place all you need to do is tweak its settings according to your requirements.
Change admin Username
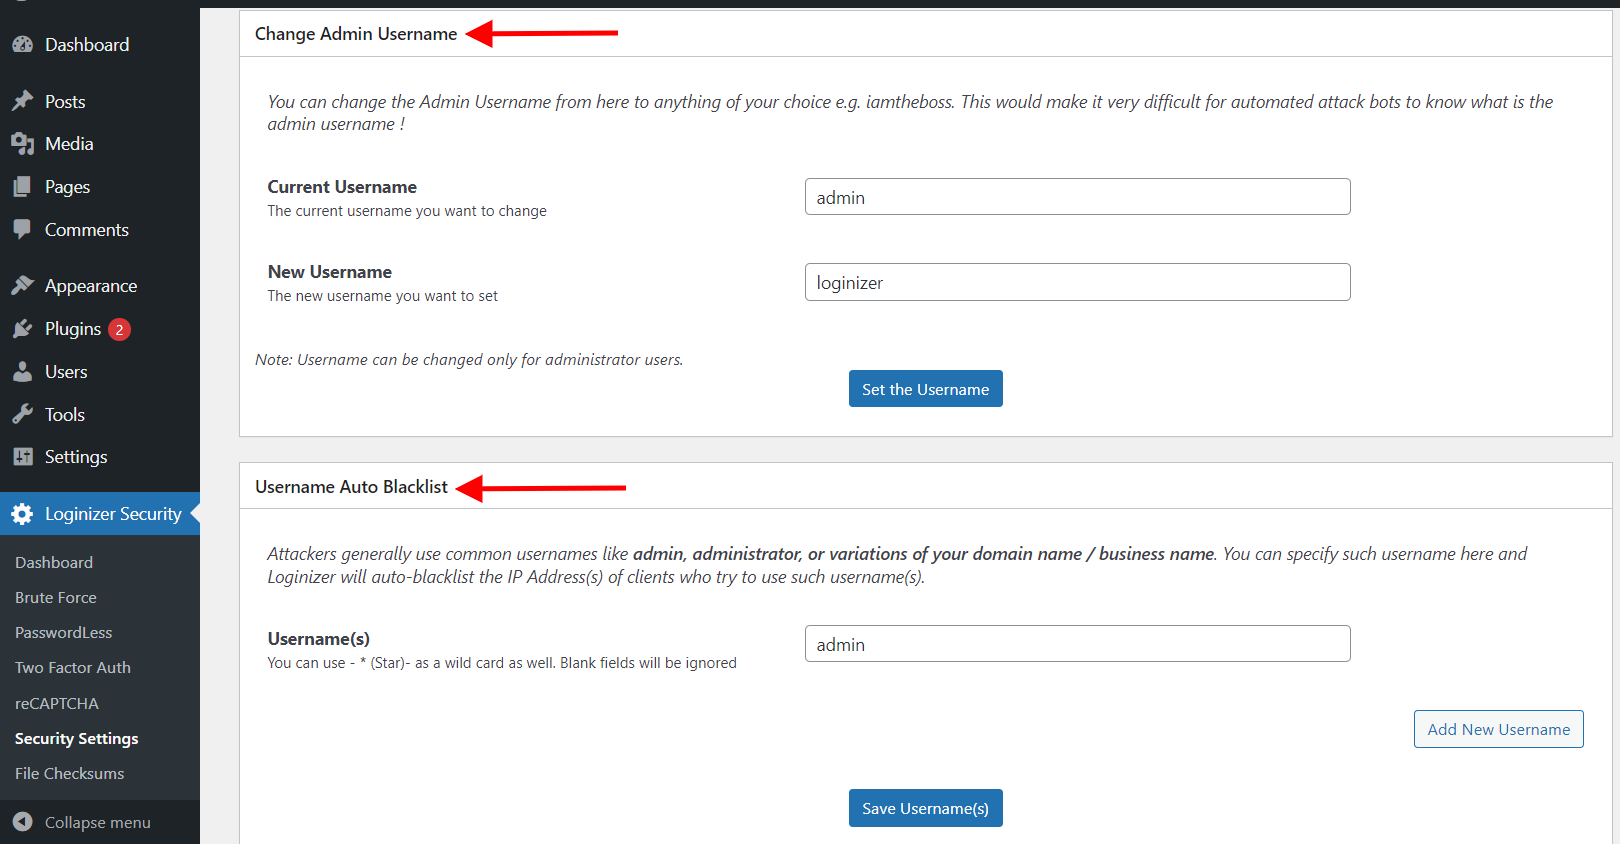
Admin is the most common username on WordPress. And by the nature of brute-force attacks by using admin as the username you are helping the attacker solve a piece of the Puzzle. Now all they need to find is the password.
So what you need to do is rename the username of your admin and add admin username or variations of admin usernames like the administration to Username Auto Blocklist.
Adding admin user name to auto block list will help block the IP of the attacker, as they will try to use admin as the username in their tries.
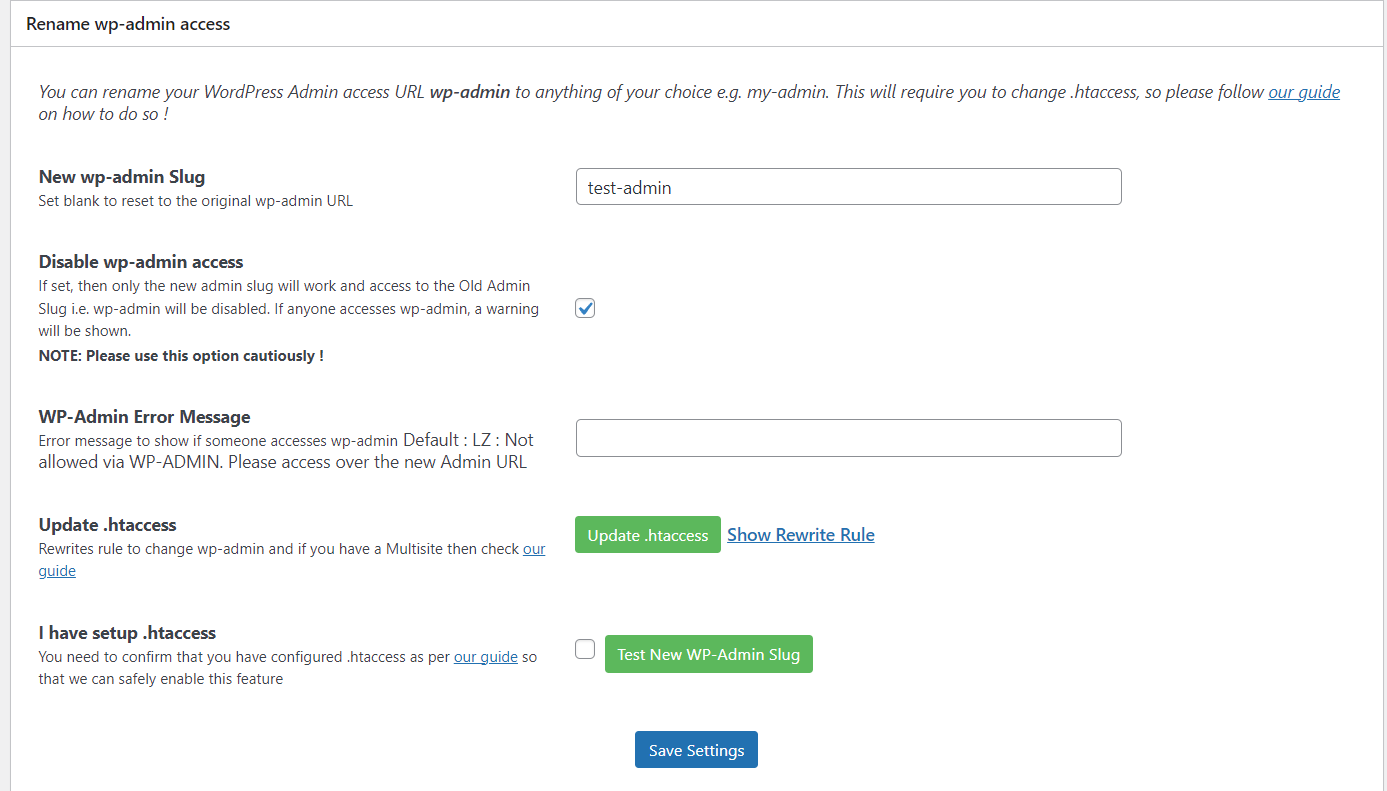
Changing login and admin slug
The reason to rename login and admin slug is to prevent the attacker to even be able to reach the page where they can try to login to your website.
But you need to make sure you change the slug of both WordPress admin and the login page. Because if you won't change slug of WordPress admin it will automatically redirect to login page if there is no user logged in.

Manually Blacklisting IPs
So when the brute-force protection of Loginizer is on it will limit the number of failed attempts. The default number of failed attempt tries is 3, which you can change as per your convenience. Once the user fails 3 times to log in it will be locked-out for 15 minutes. All the users who get's locked out will be logged with their IP's.
So you can manually blacklist the IP that fail login attempts or you can manually add IP to blacklist. This will help in blocking the IP's before hand.

Two Factor Authentication
2FA is a really easy way to harder the security of your website, Loginizer supports 3 ways to set up 2FA.
Here is a guide on how to configure Two factor Authentication in Loginizer.
The first 2 options which are 2FA using Email and App, will generate one time password(OTP). The third option that is Security Question in it you can select from the options of questions and set the answer to it. So whenever you will login this security question will be asked.
These methods add a level of difficulty to the brute-force attack even if they crack the password they wont be able to break the 2FA.
Password Less Login
If you are already using 2FA then you don't need to use this feature as they might conflict. As the name suggest in Password Less login you don't even need to add your password.
All you need is your username or email. Once you enter your email address, you will get a link to Login to your WordPress admin on your email. The link expires after 10 minutes or if used once.
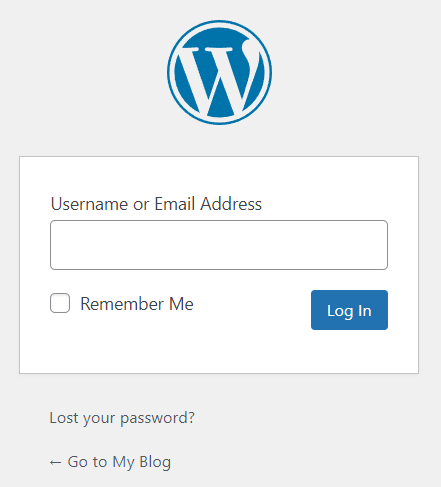
Here is the guide to Enable Passwordless Login in Loginizer.
captcha and reCAPTCHA
Using either Math captcha or reCAPTCHA can help a lot in putting hurdle if the attack is being made using a bot(which is the cases most times). captcha works well as an add-on for the security features we talked about above. Here is a guide on how to set-up reCAPTCHA.
These were the ways by which you can protect your WordPress site from brute-force attacks using Loginizer.
2. Keeping WordPress updated
You might not feel it to be important but updating WordPress or plugins you use is really important. It is because there can be security flaws in either WordPress or the plugins no system is prefect.
Once an attacker finds a flaw it slowly gets in the public domain letting other attackers use the loop holes too.
So if there is a security flaw found in WordPress or plugins and you don't update it then it makes your WordPress site vulnerable to the attack. As the vulnerability is now public that means the attackers are looking for websites that can still be compromised using the same vulnerability.
So updating Plugin and WordPress is a must as not doing that can help the attacker compromise your Website.
3. Disable XML-RPC and pingbacks.
XML-RPC was a way for other applications or systems to interact with WordPress, but these days using WordPress REST API is the preferred option. As XML-RPC adds vulnerabilities.
The vulnerabilities it adds are:
DDOS attacks via XML-RPC
The DDOS attacks could be achieved if the attacker floods your Website with pingbacks in a short period of time which will end up overwhelming the servers on which your website is hosted on end will end up taking your website down.
Pingbacks are like notifications in your comments when some other site links to you.
Brute-force attacks via XML-RPC
Whenever xmlrpc.php makes a request it sends username and password along with it unlike REST API which sends auth token which is far more secure.
Knowing that the attacker might try brute-force attack by sending combinations of password and username (n) number of times to finally hit the correct credentials and gaining access to your website.
That's why we highly recommend if you are on latest version of WordPress you should disable XML-RPC and pingbacks.
How to disable XML-RPC on WordPress
Here we will be using Loginizer to disable XML-RPC and pingbacks.
I am assuming you already have Loginizer Pro installed.
4. Using Good WordPress hosting
You might have not thought that securing your WordPress site can depend on your hosting provider too. Hosting providers plays a crucial role in maintaining security of your Website, after all they are the one who store and manage your data and website.
There are a few reasons why going with good WordPress hosting will help you secure your site and help you be at peace.
Some of the good WordPress host are Bluehost, SiteGround, Kinsta, EasyWP.
5. Having SSL/HTTPS
SSL might not feel that lucrative to buy when you starting out on creating WordPress site, but SSL/TLS helps in protecting your data.
SSL(Secure Socket Layer) is a protocol which protects your data in transit by encrypting it. So that no one on the network can sniff your data. SSL has been replaced by a new protocol called TLS(Transport Layer Security) which is built on now deprecated SSL specifications.
These days there are even free TLS providers like Lets Encrypt, which if your hosting provider allows you can set up TLS for free.
Even if you can't find out the free options the amount being paid is worth the security it provides to protect your work.
6. Using Strong Password
Using a strong password is a must, no matter what you should use a strong and unique password. As there is a possibility that if you use the same password on some other service and they face a breach then your password will become publically available.
So the brute-force attacks you will face might have database of stolen passwords, which will end up helping them login to your website far more easily. As brute-force attacks are just bots trying to login through combination of username and passwords. And these botnets can end up being in millions.
All this means is if you are using the same password somewhere else then change password of your WordPress admin and put it to something strong and unique which you don't use on any other service.
7. Scanning Malwares and vulnerabilities
WordPress being a open system there is a possibility that some plugin developer can end up making a mistake or somehow a malware enters your system or there is a possibility of WordPress having a vulnerability.
To handle that you can do 2 thing :-
Checking Checksum of files
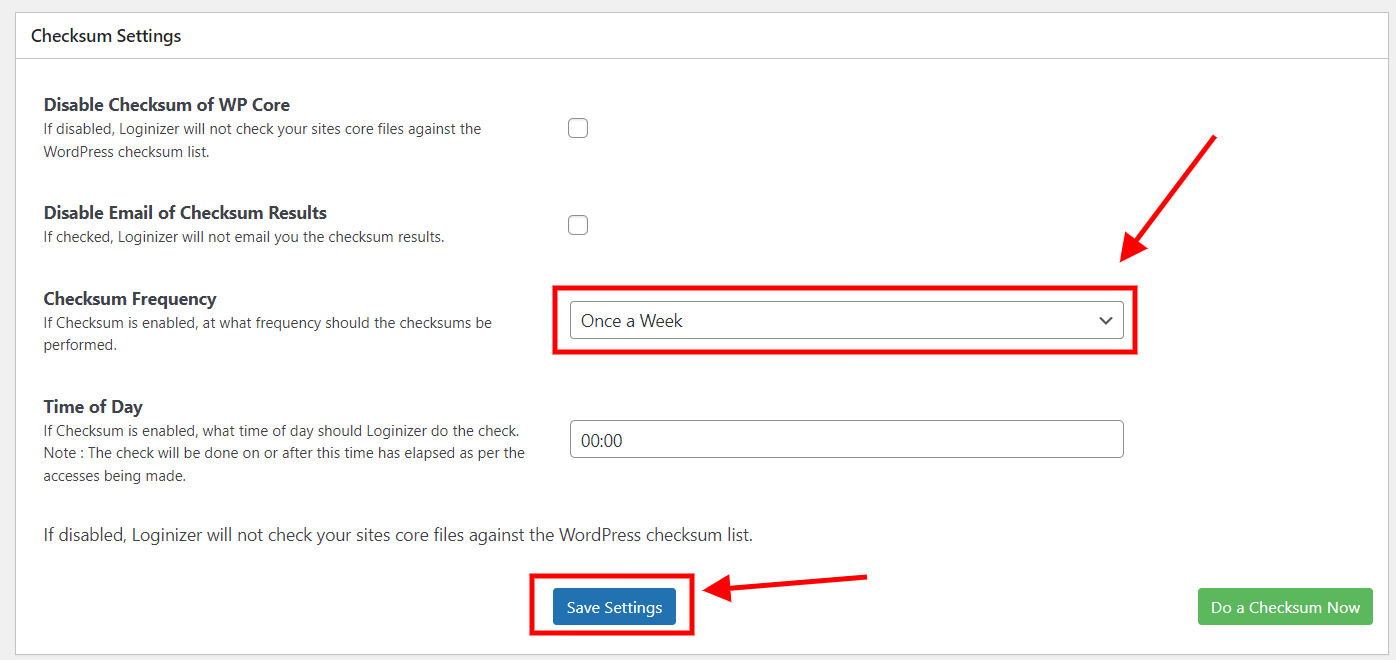
You can enable check of checksum of WordPress core files to get notified if some file has been changed. As change in file can mean some attacker injected some malicious code in the WordPress core files of your Install.
To enable it make sure you have Loginizer Pro, then follow these steps :-
Using Malware Scanners
Malware scanners can be helpful in notifying you if there is a vulnerabilities in any plugin you are using or if there is some suspicious code that they have found in your files.
There are plugins like patchstack that can help in finding vulnerabilities in the plugins you use and automatically fix those issues for you.
So what they do is they continuously research Plugins and themes to find vulnerabilities.
Then they contact the plugin developer for which they found an issue and ask for a patch for the issue. Once the developer of the plugin gives them a patch they automatically update the files of the plugin if they find you are using that Plugin with the version that is vulnerable.
8. Backups
Backups are an integral part of WordPress security, they are the B plan that you should always have. As they help when you are hit with the worst case scenario. They are useful if you lose your website or it gets hacked and you are unable to recover.
Backups ensure that you can restart your website as you have all your data with you. That's why backups should always be part of your WordPress security strategy.
The plugin we suggest is Backuply it is easy to use and Works well with no coding needed.
You should always store your backups on cloud storages. As storing your backup on the same server is risky as if it gets hacked, you will lose access to your backups. And store backups in multiple cloud backup locations as it just adds on the security.
Learn more about Backups check this article how to backup your WordPress site
Conclusion
Securing your WordPress site is not difficult, it just will need a little time and attention of yours to make sure, you use the tools available to secure your Website properly.
As the power of computation is increasing it is helping the attackers become more powerful too. So hardening security of your website is the only way to keep your self protected on the web.
WordPress being popular pulls way many attackers accounting to 90,000 attacks per minute. So make sure you follow these 8 easy steps to harden your WordPress Security.
